
I’ve always liked having control over things — especially the stuff in my home that keeps me safe. When traditional systems felt rigid and pricey, I decided to build my own Home Assistant Security System. The result? A smart, private, and affordable setup that runs 24/7 — with no monthly fees or data leaks.
Before diving in, if you’re interested in optimizing other parts of your home, you might want to check out my guide on smart thermostats for heat pumps. Comfort and control go hand in hand — just like with home security.
In this post, I’ll walk you through exactly how I set it up, what I learned, and whether such a DIY system is really worth it.
What is a Home Assistant Security System?
When people ask me, “What is a Home Assistant security system?” I usually tell them it’s like having a personal security manager that doesn’t charge rent. Home Assistant is open-source home automation software that I run on a small computer inside my house. Think of it as a smart hub where all my devices come together to talk, share updates, and follow the rules I set, not some faceless company’s preset schedule.
A traditional security system works in a fixed way: a company gives you a control box, you stick sensors on your doors and windows, and you pay them a monthly fee to “watch over” your data. With Home Assistant, I pay once, set it up, and decide exactly how it behaves. Want my lights to blink when someone rings the doorbell? Done. Need my phone to buzz if the garage door stays open too long? Easy. Want a snapshot sent to my email if someone walks up the driveway? That’s just another automation.
Here’s how it behaves in my home:
- Always on: Home Assistant runs 24/7 on a low-power device like a Raspberry Pi, ODROID N2+, or Intel NUC. It never takes a break and uses just a few watts, about the same as a nightlight.
- Local control: Everything stays inside my home network. No cloud servers, no subscriptions, no strangers peeking at my camera feeds. Even if my internet drops, my system keeps working. That’s real privacy.
- Flexible alarms: I can create different “armed states” such as Home, Away, and Night, each with its own logic. When I’m away, every sensor is live: motion detectors, doors, windows, garage, you name it. At night, I only care about the perimeter. It’s like having a system that adapts to my life instead of the other way around.
- Endless integrations: Cameras, smart locks, motion sensors, smoke detectors, water leak sensors, glass-break sensors, and even my smart speakers all play together. If someone triggers an alarm, my living room speakers can blast a siren sound that even scares me. My hallway lights flash red, my phone gets a push alert, and my front camera records a short clip automatically.
- Seamless automation: Home Assistant isn’t just for emergencies; it’s for peace of mind. I can have my front porch light turn on automatically when motion is detected after dark, or set the system to arm itself when everyone leaves the house. It feels less like a security system and more like a home that’s paying attention.
What I love most is that everything is mine, my data, my setup, my rules. I don’t need to call customer service just to change a delay timer or add a new sensor. I log in, tweak a few settings, and it’s done.
And yes, sometimes it really does feel like playing with Lego for grown-ups. Only this Lego can text me if my back door is open, flash the lights when my dog sneaks out, and remind me that I left the garage door up again.
In the end, a Home Assistant security system isn’t just about alarms or sirens, it’s about building confidence and control into your home, one smart device at a time.
Benefits of Home Security Systems
Whether you go DIY or professional, home security systems offer some undeniable benefits.
Here’s what I’ve personally noticed since setting up my Home Assistant security system:
1. Deterrence: Even a simple camera by your door makes potential intruders think twice. Visible sensors and alarms are strong deterrents — no need for fake “Protected by ADT” stickers (though I won’t judge).
2. Peace of Mind: There’s something comforting about checking your dashboard before bed and seeing all doors closed, sensors armed, and cameras streaming fine.
3. Insurance Savings: Many insurers offer discounts for monitored systems — even DIY ones. Some only need a few proof photos of installed cameras and alarms.
4. Privacy and Local Control: Commercial systems often record to the cloud, which can be a privacy risk. Home Assistant keeps everything in-house, literally.
5. Smart Automation Perks: This is where it gets fun. Because it’s part of my larger Home Assistant ecosystem, I’ve connected my security automations to other smart devices.
For example:
- If motion is detected outside at night, → porch light turns on
- If the system is armed, → the thermostat lowers and the lights switch off
- If alarm triggers → all lights flash red (it’s dramatic, but effective)
In short, a DIY security setup doesn’t just protect your home — it makes it smarter.
Why I Chose Home Assistant for Home Security
I’m not here to sell you a product. I’m showing you what I built, what worked, and what didn’t.
I picked Home Assistant because it gives me full control. All logic runs locally — no mystery cloud servers, no subscriptions. Just my network, my data, my rules.
Plus, I already used Home Assistant for climate control — something I covered in my previous thermostat post. Integrating it into my security setup was a natural next step.
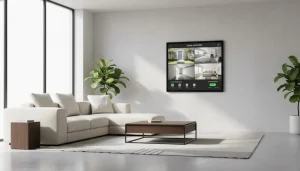
Once I got it running, I saw how flexible it is: alarms, sensors, camera feeds — all connected under one digital roof. And because I built it, every tweak and change is mine to make.
My Affordable Home Security System Setup
Here’s how my Home Assistant Security System came together — simple, effective, and surprisingly affordable.
What I used
- A Raspberry Pi (or mini-PC) running Home Assistant
- Connected panels to connect wired sensors
- A few Wi-Fi / IP cameras
- Motion detectors and door/window sensors
- A siren or smart speaker as an alert system
The total cost stayed well below what many pay for ADT in a few months. It took a weekend to set up, but the peace of mind since then. Worth every hour.
How to Install Security Cameras at Home: Easy Guide
Cameras are usually the first thing people think of when they hear “home security.” I was no different. Setting them up with Home Assistant is straightforward, though placement is just as important as wiring.
Here’s how I handled it:
- Choose the right cameras. I went with IP cameras that work on my local network. Brands like Reolink and Amcrest offer affordable models.
- Placement is everything. Outside cameras should cover entry points like front doors, back doors, and garages. Inside, I use them sparingly—just key spots like hallways. I don’t need a constant live stream of my kitchen.
- Connect to Home Assistant. Using integrations, I added the cameras to my dashboard. From there, I can watch live feeds, record clips, or trigger recordings when motion is detected.
- Automate with sensors. My front door camera starts recording if the door sensor trips while the system is armed. Simple and effective.
I like to remind myself: the goal is safety, not paranoia. Too many cameras, and you’ll feel like you live in a reality show.
Home Assistant Alarm: Keep Your Home Safe
Now let’s talk about the Home Assistant alarm feature. This was where I felt like my DIY setup became a “real” system.
The basics: I created armed states like Home, Away, and Night. Each mode uses different sensors. For example, in Away mode, every sensor matters. At Night, I only care about doors and windows.
Here’s what I included:
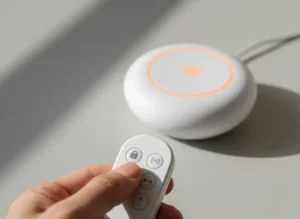
- Entry/exit delays so I have time to come and go without tripping the siren.
- Flexible disarming using a PIN code, my phone, or even locking/unlocking my smart door.
- Notifications—my phone buzzes instantly if something triggers.
- Partitions. I run a separate alarm mode for my guest suite, so visitors don’t interfere with my main system.
Once I had the alarm running, I realized how much control I actually had. Unlike store-bought alarms, I wasn’t stuck with one way of arming or one kind of sensor. I made the rules. And yes, I may have accidentally set off my own siren at 2 AM while testing—but that’s just part of the fun.
The alarm is where everything finally feels real. My Home Assistant security system isn’t just quietly watching anymore — it reacts. And sometimes, it reacts louder than expected (ask my neighbors about that 2 AM test run).
When I first set up the alarm, I wanted something simple: arm it when I leave, disarm it when I return. But Home Assistant’s flexibility pulled me in deeper. Before I knew it, I had custom modes, smart triggers, and automations I didn’t even know I needed.
Here’s how I built it step-by-step:
-
Added the Alarm Integration
I used the built-in Alarm Control Panel in Home Assistant, but I recommend trying the Alarmo integration. It gives you a clean dashboard, easier automation control, and more customization than you’ll ever need. -
Connected My Sensors
Every door and window sensor feeds data into Home Assistant. I labeled each one clearly — “Front Door,” “Living Room Window,” “Kitchen Motion.” That way, when something trips the alarm, I instantly know where. -
Created Multiple Modes
-
Home Mode: Arms just the perimeter — useful for nights when I’m inside.
-
Away Mode: Everything’s armed, including motion sensors.
-
Vacation Mode: Adds extra layers, like flashing lights if motion is detected.
-
Custom Mode: My “test” mode, because you never want your first siren test to happen unplanned.
-
-
Set Entry and Exit Delays
Nobody likes sprinting for the keypad. I gave myself 30 seconds to leave and 20 seconds to get in. You can adjust these times easily. -
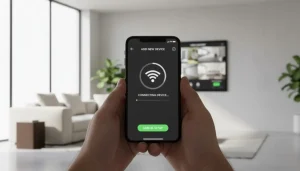
Automated It with Presence Detection
Home Assistant can arm and disarm automatically based on who’s home. My phone acts as a digital key — when it connects to Wi-Fi, the system disarms. When it leaves, the system arms itself. No buttons, no hassle. -
Linked It to Notifications and Lights
When the alarm triggers, I get an instant push notification. My hallway lights also flash red — a small touch that feels straight out of a movie.
And yes, there was a learning curve. I accidentally armed it once while I was still inside, and let’s just say the siren works very well. But once I got it right, the setup became second nature.
This kind of control is exactly why I love my Home Assistant alarm. It’s not a cookie-cutter system. It’s mine — flexible, reliable, and, if we’re being honest, a little bit fun to show off.
Home Security Motion Sensor: How It Works
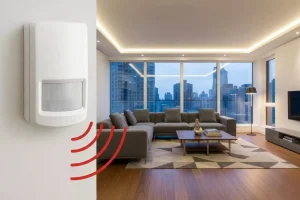
Motion sensors are the real MVPs of my setup. Cameras are cool, but motion sensors? They’re the ones doing the heavy lifting. My Home Assistant security system depends on them to know when something’s moving that shouldn’t be.
When I first started adding them, I thought motion sensors were all the same — until I realized how many little details actually matter. Placement, sensitivity, even lighting can change how they perform. The good news? Once you dial them in, they’re like quiet bodyguards that never take a break.
How I Use Motion Sensors in My Home
I have sensors in a few key spots — the hallway, living room, and near the back door. I skip bedrooms and bathrooms (because, you know, privacy). These sensors talk directly to Home Assistant through Wi-Fi or Zigbee, depending on the brand.
When one picks up movement, it can do several things:
-
Trigger a camera to start recording.
-
Turn on lights automatically.
-
Send me a push notification.
-
Activate the alarm if the system’s armed.
Basically, motion equals action.
The Setup
Getting motion sensors connected is easier than it sounds. I just pair them with my hub and assign each one to a specific “zone” in Home Assistant. Once they’re in, I can see every trigger in real time — a great way to test if they’re positioned right.
One lesson I learned quickly: don’t aim them straight at windows. Sunlight or passing cars can cause false alarms faster than you can say “what was that noise?” A little tilt or repositioning fixes that instantly.
I also played around with sensitivity levels. At first, my hallway sensor triggered every time my cat walked by. Cute, but not ideal at 3 AM. A quick tweak in Home Assistant’s settings solved it.
Smart Automation
This is where it gets fun. I connected my motion sensors to automations. For example:
-
At night, if motion’s detected in the hallway, the lights turn on at 20% brightness — just enough to guide me to the fridge without tripping over anything.
-
If motion’s detected while the system’s in Away Mode, the alarm arms instantly and sends me a phone alert.
You can make it as simple or as advanced as you want. That’s the beauty of a Home Assistant setup — it listens, reacts, and never complains about extra work.
Why I Trust Motion Sensors
They’re fast, reliable, and don’t need much maintenance. I check the batteries every few months, and that’s about it. No subscriptions, no hidden costs, just pure functionality.
I’d argue motion sensors are the foundation of a good DIY security system. Without them, your setup’s basically guessing. With them, it’s aware, responsive, and even a little bit smart.
My favorite part? They make my Home Assistant security system feel alive. The lights know when I walk by, the cameras wake up only when they should, and I get peace of mind knowing that if someone moves where they shouldn’t — I’ll know before they do.
Home Assistant vs. ADT: The Cost Question
Here’s where the money talk comes in. A lot of people ask how my setup compares to something like ADT. After all, the home security system ADT cost is usually what keeps people tied down.
Here’s how I see it:
-
ADT and similar companies charge monthly. That might be $40–$60 every single month. Add in installation, activation, and “special monitoring” fees, and it starts feeling like a second utility bill.
-
Home Assistant costs upfront. I bought a Raspberry Pi, a few sensors, and a couple of cameras. That was a few hundred dollars, tops. After that? No subscriptions. No “premium access” upsells. Just maintenance, which is mostly me dusting off the sensors once in a while.
The trade-off is simple. With ADT, someone else monitors your house. With Home Assistant, I monitor mine. And honestly, I like it that way. If something happens, I know instantly. I don’t have to wait for a call center to confirm what’s going on in my own home.
That said, Home Assistant doesn’t mean “no professional monitoring” — it just means optional. I can connect to services like Noonlight if I want extra coverage, but it’s entirely my choice. That’s the beauty of it — full flexibility, no contracts.
Long-Term Costs: The Math That Matters
Let’s do some quick math. Suppose ADT costs $50 per month. That’s $600 a year. Over five years, that’s $3,000 — and you don’t even own the hardware.
My Home security system setup cost me roughly $350 to build. Maybe I’ll replace a sensor or two down the line, but even if I throw in upgrades, I’m still way under what ADT would charge in the same time frame.
That gap — those thousands saved — can go toward something else that actually improves your home, like upgrading your Wi-Fi network or, if you’re like me, adding a smart thermostat for comfort and energy savings.
Convenience vs. Control
ADT’s biggest advantage is convenience. They handle installation, support, and monitoring. But that convenience has a price — both literally and figuratively. You’re limited to what their app allows, and you’ll often find small upgrades costing extra.
Home Assistant, on the other hand, gives you total freedom. You can automate anything, integrate any device, and change how it behaves whenever you want. There’s no “please contact support” message — just you, your setup, and your creativity.
Sure, it takes a bit of technical curiosity to get started. But I’d rather spend an evening configuring automations than spend years paying for a system I can’t fully control.
My Honest Take
If you want a plug-and-play solution and don’t mind a monthly bill, ADT is fine. It’s polished, predictable, and it works.
But if you’re someone who enjoys tweaking, improving, and actually understanding how things work — Home Assistant wins every time. It gives you control, privacy, and a system that’s truly yours.
At the end of the day, I’d rather invest in something I own than rent security month after month. My home, my rules, my alerts — and my wallet stays happier for it.
Are Home Security Systems Worth It?
Let’s face it: the big question isn’t “how” but “why.” Are home security systems worth it in the first place?
For me, yes. I sleep better knowing my home is watched, even if it’s by my own setup. It’s not about being paranoid—it’s about peace of mind.
But here’s the real answer: it depends on you.
- If you live in a high-traffic area or have valuable gear at home, a system is a smart move.
- If you live in a rural area with no neighbors nearby, it’s even more useful.
- If you’re in a tiny apartment with nothing but IKEA furniture… maybe less urgent.
I like the balance I get. My system cost less than a year of ADT, and now it’s mine forever. That feels worth it to me.
Hardware I Recommend
Home Assistant needs a device that runs 24/7. I’ve tested a few options:
- Raspberry Pi 4 – Small, cheap, and perfect for most setups.
- Home Assistant Yellow – Built for this, but not always easy to get.
- ODROID N2+ – A strong alternative to the Pi.
- Intel NUC – Overkill for some, but I like the extra power when running multiple add-ons.
Personally, I started with a Raspberry Pi, and it’s still running like a champ. If it fails, I’ll probably jump to a NUC for speed.
Advanced Tips for Smarter Security
Once the basics are running, you can get creative. I’ve set up automations that make my home feel alive:
- My lights flash red if the alarm is triggered.
- A siren plays through my smart speakers.
- I get a photo on my phone from my front door camera if motion is detected.
- The system arms automatically when everyone leaves the house.
Little touches like this make the system more than just alarms—they make it feel integrated with my daily life.
One extra tip: always secure your Home Assistant with strong passwords and, if possible, VPN access for remote control. Safety should never stop at the front door.
FAQ — Quick Answers from My Setup
Q1. Is a DIY Home Assistant Security System reliable?
Ans : Very. Once configured, it’s solid. Mine runs for months without downtime.
Q2. Do I need coding skills?
Ans : Not at all. Most setup steps are visual and beginner-friendly.
Q3. Which cameras work best?
Ans : Any IP or Wi-Fi model that supports ONVIF/RTSP.
Q4. Can it run offline?
Ans : Yes — everything works even if your internet goes down.
Q5. What’s the total cost?
Ans : Roughly $150–$200 depending on gear. Zero ongoing fees.
Final Thoughts
I like having control over my home. A Home Assistant security system lets me build something flexible, private, and cost-effective. It’s not perfect—you’ll need some patience to set it up—but it’s worth it. Just like I tuned my smart thermostat for comfort and efficiency, this setup gives me the same sense of control, only now it’s about safety. At the end of the day, I’d rather test a siren at 2 AM by accident than pay a stranger every month to watch my house. My system works the way I want, and that’s the point.