
Did you know that programming your thermostat properly can save you around 10 percent a year on heating and cooling costs? That’s real money you can keep just by knowing how to program a Honeywell thermostat. When I first started experimenting with my thermostat, I didn’t expect a few button presses to make such a difference in comfort and energy bills, but it really does.
Whether you have a simple 6000 series or a Wi-Fi smart model, learning how to program a Honeywell thermostat is easier than it seems. In this guide, I’ll walk you through everything step by step, sharing tips that actually work and mistakes I’ve learned to avoid along the way.
What You’ll Learn
Here’s a quick overview of what I’ll cover so you know exactly what to expect:
- How I prepare my Honeywell thermostat before programming
- Step-by-step programming for different thermostat models
- Key differences between basic, touchscreen, and smart thermostats
- Tips that save energy without compromising comfort
- Common issues and troubleshooting strategies
- Important FAQs to keep things simple
Why I Always Program My Thermostat
I like my home to feel just right without having to constantly adjust the temperature. A programmed thermostat does that for me. Here’s what it gives me:
- Saves money by reducing unnecessary heating and cooling
- Improves comfort by keeping my home at the right temperature
- Adds convenience because I don’t have to think about it
- Supports efficiency by running my HVAC system only when needed
For anyone looking to combine thermostat programming with broader smart home energy strategies, I’ve also shared some useful ideas in a post on smart home automation that can complement your setup.
Honeywell Thermostat Types: Find Your Best Match
Honeywell makes several types of thermostats, and knowing which one you have makes programming much easier. Each type works a little differently, so it helps to understand the options before you start.
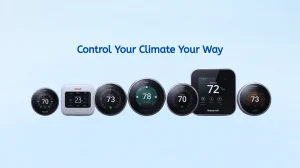
Basic Programmable Thermostats – These are the simple, classic models, like the 6000 series. They use buttons to set schedules, which makes them easy to understand. I like them because they do exactly what you need without any extra features. Even though they are simple, they still allow you to set weekday and weekend schedules easily.
Touchscreen Thermostats – Models like the 7000 and 8000 series have clear, easy-to-read screens. I enjoy using these because the display shows me each step, so I don’t have to guess what to do next. Setting schedules is faster, and it’s easy to adjust or check your settings at any time. These are great if you prefer a more visual way to program your thermostat.
Wi-Fi Smart Thermostats – The T5, T6 Pro, and T9 are smart models that connect to your phone. I find these really convenient because I can change schedules from anywhere. Whether I’m at work or running errands, I can make adjustments with just a few taps. These thermostats also work well with smart home devices, which is handy if you want extra control over your home’s comfort and energy use.
If you’re not sure which model you have, check the label on the thermostat or inside the cover. Knowing your model before you start is like having a map before a trip—it makes the whole process easier. Once you know what you’re working with, programming your Honeywell thermostat becomes simple, and your home stays comfortable without any guesswork.
Thermostat Setup Checklist: What to Do Before You Start
Before I start pressing any buttons, I like to get everything ready. It saves me time and avoids mistakes later. Setting up a Honeywell thermostat isn’t hard, but being prepared makes the process smoother. Here’s how I usually get ready before programming mine.
- Know My Schedule
First, I write down my daily routine. I note when I wake up, leave for work, come home, and go to bed. This helps me decide when my heating or cooling should turn on or off. Having a clear schedule in front of me keeps things simple and avoids unnecessary adjustments later. If you’re like me and your week doesn’t always follow a perfect pattern, get as close as you can. A good schedule still saves energy even with small changes. - Keep the Manual Nearby
Even though Honeywell thermostats are usually pretty easy to figure out, I like to keep the manual close during setup. The first time I used one, I pressed the wrong button and had to start all over again. Having the manual nearby saves that headache. If you can’t find your copy, you can search for your model number online and download the guide in minutes. - Understand the Buttons
On the basic models, I take a minute to learn what each button does before I start. The main ones are Set, Program, Run, and the arrow keys. I press each one to see what it controls. This little step might sound small, but it saves me from confusion later when I’m setting times and temperatures. - Check the Batteries
This one seems obvious, but it’s important. If the display looks faint or the screen doesn’t light up, I change the batteries right away. A weak battery can make the thermostat reset or lose all my settings halfway through programming. I usually replace them once a year, just to be safe.
Once I’ve done all that, I’m ready to go. With everything prepared, programming the thermostat is quick, easy, and honestly, a bit satisfying—especially when I see how much smoother my home temperature feels afterward.
How I Program My Thermostat: Tips for Comfort
Most Honeywell thermostats use what’s called a 5-2 day schedule. That means I can set one routine for weekdays and a different one for weekends. It’s a simple system that fits my routine perfectly. Here’s how I like to program mine.
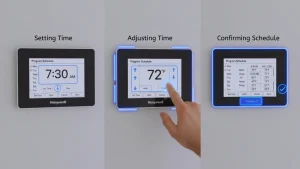
Step 1: Enter the Programming Menu
I start by pressing the Set or Schedule button. On some models, there’s a button labeled Program, and that works too. Once I press it, the display shows the first time block, which means it’s ready for me to begin. This part is straightforward—just follow what you see on the screen.
If I make a mistake, I don’t panic. I simply press Cancel or go back a step. The thermostat doesn’t mind if you take your time.
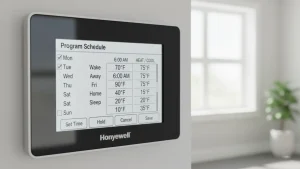
Step 2: Set the Weekday Schedule
During the week, I like my thermostat to follow my daily routine. I divide each weekday into four main parts:
- Wake – When I get up in the morning.
- Leave – When I go out for work or errands.
- Return – When I get back home.
- Sleep – When I go to bed.
Then I set the time and temperature for each part. I use the arrow keys to make adjustments. For example, in winter, my weekday schedule looks something like this:
Wake at 6:30 a.m. with 70°F for heating and 76°F for cooling.
Leave at 8:00 a.m. with 62°F for heating and 80°F for cooling.
Return at 5:00 p.m. with 70°F for heating and 76°F for cooling.
Sleep at 10:00 p.m. with 65°F for heating and 78°F for cooling.
I like that the thermostat automatically shifts from one setting to another, so I don’t have to think about it throughout the day. After setting each period, I press Next to move to the following one.
If you have a routine that changes often, don’t worry. You can always come back and adjust your settings later. Once you understand how to program a Honeywell thermostat, making changes becomes second nature.
Step 3: Set the Weekend Schedule
My weekends look very different from my weekdays, so I adjust my settings accordingly. I usually wake up later, spend more time at home, and go to bed a bit later, too.
Here’s what my typical weekend setup looks like:
Wake at 8:00 a.m. with 70°F heat and 76°F cool.
Sleep at 11:00 p.m. with 65°F heat and 78°F cool.
Since I’m usually home all day on weekends, I skip the Leave and Return periods. This keeps things simple while still keeping the temperature comfortable.
One thing I like about Honeywell thermostats is that they remember both weekday and weekend schedules separately, so once I set them, I don’t have to do it again unless my lifestyle changes.
Step 4: Save the Settings
After finishing all the time blocks, I press Done or Run Schedule. That’s it—my thermostat now follows my plan automatically.
If I ever forget what I’ve programmed, I just open the Schedule screen to check what’s currently set. It’s a small detail, but it’s reassuring to see everything laid out clearly.
Once it’s all set up, I usually step back and smile because I know I won’t have to fiddle with the temperature all day. The thermostat takes care of it for me, keeping my home cozy while saving energy. It’s one of those little things that quietly make life easier.
Touchscreen Thermostat Setup: Quick and Easy Process
I enjoy using Honeywell’s touchscreen models because they make programming much easier. Everything I need is right on the screen, and I can see my changes as I make them. It feels quick, clear, and less confusing than using buttons.

Here’s how I usually set mine up:
- Tap Menu
I start by tapping the Menu option on the display. This opens the main settings panel, where all the options appear in simple icons. - Select Schedule
From the list, I tap Schedule. The thermostat then shows the current day and the temperature periods I can adjust. - Pick the Days to Set
I choose which days I want to create or change a schedule for. Some people set each day differently, but I prefer using one plan for weekdays and another for weekends. It saves time and keeps things consistent. - Adjust the Time and Temperature
For each period, I set both the time and the temperature. The interface makes it easy to slide or tap to the number I want. I usually create four time blocks: Wake, Leave, Return, and Sleep.
- Wake: The time I usually get up
- Leave: When the house is empty
- Return: When I’m back home
- Sleep: When it’s bedtime
Setting these helps the thermostat match my daily routine without wasting energy when no one is home.
- Tap Done to Save
Once I’ve adjusted everything, I tap Done. The thermostat saves my settings and starts following the schedule right away.
The touchscreen layout guides me step by step, so I rarely make mistakes. It also feels more interactive since I can see how each change affects the schedule. Once it’s programmed, I can leave it alone and trust it to keep my home comfortable.
If I ever want to change the settings remotely, some touchscreen models like the Honeywell T5 or T6 Pro connect through the Honeywell Home app. I find it convenient when I’m at work or traveling. I can open the app, adjust the temperature, and save energy even when I’m not home.
That’s one of the biggest reasons I recommend learning how to program a Honeywell thermostat properly. Once it’s set up right, it works in the background while I go about my day.
Smart Thermostat Programming: Save Energy Fast
Smart Honeywell thermostats make home comfort effortless. I use models like the T5, T6 Pro, and T9 because they let me program and control everything directly from my phone. Whether I’m home, at work, or on vacation, I can always adjust the temperature in seconds through the Honeywell Home app.
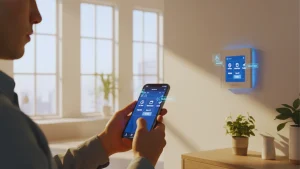
Here’s how I usually program my smart thermostat:
- Open the Honeywell Home app
I start by opening the app on my phone. Once I sign in, it shows my connected devices, including the thermostat. - Select my thermostat
I tap the thermostat I want to control. This brings up all the options, such as temperature settings, scheduling, and modes. - Tap Schedule and then Edit
Inside the Schedule section, I tap Edit to begin setting my preferred times and temperatures. The layout is simple, showing each day and time period. - Set the time periods and temperatures
I adjust the schedule for my daily routine so the house stays comfortable while saving energy.- Wake: When I usually get up
- Leave: When I head out for work or errands
- Return: When I get back home
- Sleep: When it’s time to wind down for the night
I can easily change the temperature for heating or cooling in each period by tapping the numbers on the screen.
- Tap Save
When I’m done, I tap Save to confirm the schedule. The thermostat updates right away and starts following the new plan.
What I like most about this setup is how flexible it is. If my plans change, I don’t need to touch the thermostat at home. I can open the app, adjust the settings, and the changes take effect instantly.
For full smart home convenience, I also connect my thermostat to voice assistants like Google Assistant or Amazon Alexa. Saying “set the temperature to seventy” is all it takes to make the change. It’s simple, fast, and fits perfectly with the rest of my smart home setup.
If you learn how to program a Honeywell thermostat through the app, you’ll see how much time and energy it can save. Once it’s set up correctly, it keeps your home comfortable without any extra effort.
My Favourite Programming Tips
After years of adjusting thermostats, I’ve learned a few tricks:
- Use Hold Mode Wisely – Only temporarily override the schedule when needed.
- Adjust Seasonally – I review my schedule twice a year for optimal comfort.
- Vacation Mode – Lower or raise temperatures when away to save energy.
- Check Batteries – A yearly replacement prevents lost settings.
- Gradual Adjustments – Avoid extreme swings to reduce HVAC strain.
Troubleshooting Programming Issues
Sometimes things don’t go as planned. Here’s what I check first:
Schedule Not Following – Make sure Hold isn’t active and that time and day are correct.
No Heating or Cooling – Verify the mode, check the breakers, and inspect the HVAC system.
Blank Screen – Replace batteries or confirm wall plate connections.
Wi-Fi Drops – Restart the router and thermostat; ensure the device is within range.
If these don’t work, it’s often a wiring or HVAC issue requiring professional attention.
FAQs
How do I manually program my thermostat?
I press Set or Schedule, select the time blocks, and adjust the temperature. Most models allow four blocks per day.
Can I program my thermostat remotely?
Yes. Wi-Fi models let me adjust schedules from the Honeywell Home app anytime.
What if the schedule doesn’t stick?
Check that Hold mode is off, the batteries are fresh, and the correct time is set.
Final Thoughts
Programming my Honeywell thermostat has been one of the simplest ways to save energy and maintain comfort. Once set, I barely have to think about it. Following these steps, whether you have a basic, touchscreen, or smart model, ensures your home stays just right.
If you’re looking for expert guidance or want a professional setup, contacting a technician is always a good option. And if you want to expand your smart home control further, you can explore smart thermostats for heat pumps in my heat pump comfort guide.
Take a few minutes to program your thermostat and enjoy the comfort and savings—it’s worth it.